Welcome To Ovenminded

About My Bakin', Cookin', Wine Makin'!

Thursday, July 28, 2011

WGB#8 Transitional Rye Hearth Meteil

This is a rye bread that I enjoyed more than the BBA NY rye.It has a rich flavor of rye and wheat, nutty,tangy from the buttermilk, and a hint of orange and anise flavor from the a seed ,chewy crust and completely satisfying eating experience.We enjoyed it soo much, decided to thaw out the last half of our home made pastrami and have Reuben sandwiches tonight.The bread utilizes a soaker and a biga, next day the final dough is made, with the addition of caraway seeds or anise, or orange or lemon zest.For one loaf I used orange zest and anise seeds, the other caraway. I was inspired by  Joe ,to be a little creative in slash cuts of my bread, he has some of the most artistic breads I have seen. 
 I had rye bran ,sifted out during the white rye bread from the BBA, added an ounce as part the final amount of rye flour.Used molasses as well.Rye and whole wheat flour takes longer to hydrate,so I let it rest during the kneading to fully hydrate before adding additional flour, then again after the final knead just to be sure.The dough rose rather quickly,less than 45 minutes, and after shaping it rose in less than 45 minutes.
I dusted the tops with Rye flour prior to shaping, next time I'll use bread flour for a stronger color contrast .Since I made 2 loaves I reduced the baking time to 30 minutes total, rotating the sheet pan after 15 minutes, used a steam pan as directed.
the one left  contains caraway seeds , the other orange zest and anise seeds
orange zest visible in crumb
the crumb was dense but tender and a bit moist.I find the bread usually firms up the next day and loses that moisture.To date this is the best tasting rye I have made.

Wednesday, July 27, 2011

My favorte Dinner Rolls

When we lived on Long Island in NY, we had the fortune ( misfortune for our waist line!) to be near the Entemen's bakery, and outlet. It's a dieter's nightmare, especially for my prepondency to love cake, doughnuts cheese stuffed baked goodies. Well, eventually we swore off the trips to the outlet store,and not too soon! One Sunday they ran a story in the local paper about Entemen's history and family, included were 2 recipes, one for chocolate chip cookies and the other a dinner roll created by the son, then CEO. I never made the cookies, strange, but the dinner rolls were THE rolls for any celebration dinner, or any dinner as far as I'm concerned.
  The recipe:
 3-3 1/2 cups AP flour
1 package dry yeast
 1/4 cup sugar
1 cup whole milk ( or of choice)
 3 tbsp butter softened
 1 large egg lightly beaten
1 tsp salt
 METHOD:
1. In large bowl of mixer, blend 1 cup of the flour with yeast and sugar.
 2. In sauce pan ( or microwave safe measuring cup or bowl) melt butter into milk until 120 degrees .Blend into flour mixture add egg and continue to beat two minutes. Stir in remaining flour and salt. NOTE at this point the dough should be more a shaggy mess then a ball. I leave it as is at this time,and let it rise covered, with the paddle in the bowl in a warm place till doubled.
 3. When doubled return bowl to mixer stir down and add any additional flour as needed .We want a soft smooth dough, turn out and knead about 5 minutes till resilient and no longer sticky but a little tacky.
Let rest covered 5 minutes.Cot into 15 equal size pieces, make  rounds or balls as follows, I  take a piece of dough and pull the skin,whichever has most surface (the outside or the cut  inside)over or down to the base to make a ball,place a piece of dough in my left hand and using thumb an forefinger of my right hand, pull the skin of dough up to the top and pinch to seal. turning the ball  pull up and pinch all around to create a  tight surface  ( Imagine a piece of cloth in your hand with a piece of dough in it,the cloth is the outer 'skin' and pull up the cloth to top and pinch, turn and pinch).Place seam side down in a 9x13 buttered baking dish( I prefer glass) .Cover let rise till doubled. bake in a  pre heated400 degree oven, 15 minutes till well risen and browned on top. Enjoy!!

                                                If by some miracle all are not eaten, can be reheated, wrapped in foil in oven, or wrapped in paper towel in microwave ,oven 15 minutes, microwave 15-40 seconds depending on how many.

Friday, July 22, 2011

Eggplant Parmigianna

True story: I just came home from wherever, I was 14 at the time, on the stove is a pan of, OMG, my favorite, EGGPLANT PARM!!!!. I grabbed a fork and not even bothering to get a plate, began to feast, halfway through, MOM, walks in...WHAT ARE YOU DOING??? THAT'S YOUR FATHER'S DINNER!!
Well, don't recall the repercussions from that event, but the fact remains, I LOVE EGGPLANT PARM!!
Not just any one's , my eggplant parm, why? have not had better. Thin sliced ,floured,egged ,breaded ,fried crispy,layered with the wife's marinara sauce and mozzarella cheese....I'm drooling....
 Most people have had, or have made this wonderful Italian favorite, and I'm sure there are some who would like to, but are intimidated, or don't know how. Just relax, it's easier than you think, not quick, but simple. Select a day or two, if time is an issue, so you are not stressed to get done, you can make the marinara sauce in advance, PLEASE DON'T BUY JAR SAUCE!!   I WILL NEVER FORGIVE YOU!

Let's make some eggplant parm....
 FIRST THE SAUCE:
 you will need
 2  28 oz cans of crushed tomatoes, I use only tuttorosso brand. Change the ingredients and you change the outcome. I know I'm prejudiced about this dish, so ,PLEASE, try to get tuttorosso.
1 medium onion chopped small
2 cloves garlic minced fine
3 tbsps olive oil
about 1 tbsp sugar ( depending on taste, the tomatoes sometimes can be acidic)
1/4 - tsp dried oregano
1/2 tsp dried basil or 1 +1/2 tsp minced fresh
1 tsp chopped fresh Italian parsley ( the flat leaf type)
salt and black pepper to taste
PROCEDURE:
 in a heavy bottomed pot ,heat olive oil over medium heat, when hot, add onions, saute till soft don't brown. Add garlic, saute 1-2 minutes  don't brown or garlic will be bitter. 
add the 2 cans  crushed tomatoes, and herbs, stir all together, bring to boil. lower to a simmer, cover, cook 2 hours stirring often, lower heat if simmering too high, you want a gentle simmer. remove from heat let cool, use or when completely cool put in fridge till needed.
 
FOR THE EGGPLANT:
2 medium eggplants ( the large black skin type) , about 1 lb or more each
about 2 quarts whole milk
about 1 cup all purpose flour
about 3 cups dry 'unseasoned' bread crumbs
about 8 large eggs
  PROCEDURE:
 cut off top of eggplant just below the leaves, and trim a slice off the bottom, peel.
slice eggplant in 1/8" thick round slices
 Place sliced eggplant into a gallon zip bag or use 2 bags if needed
 add enough milk to submerge slices pressing out air and seal, eggplant should be covered with milk. place bag(s) into large bowl ( as a precaution against leaks) put in fridge for 1 hour
 the milk removes any bitterness and 'sweetens' the eggplant  


                                                I tried slicing one length wise, mistake, stay with rounds.

 Drain eggplant discard milk,
 use 2 rimmed large baking sheets one for bread crumbs one for the breaded slices
beat 4 eggs in a bowl till frothy. then place in a pie pan, cake pan etc
put flour into a plastic see through bag, and add 3 eggplant slices, one at a time, shaking bag each time to coat,dip into egg, then bread crumbs, place onto another tray
continue till all are done using more eggs, flour,bread crumbs as needed
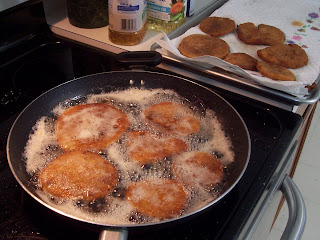
fry slices on both sides till browned, in hot oil about 375, on my electric cook top that's at # 4-5, drain onto paper towel lined sheet pan
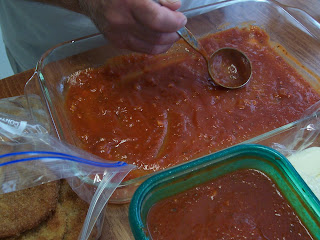
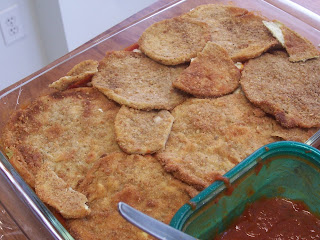
when all are done assemble ,first a layer of sauce on bottom of 9x13 pan
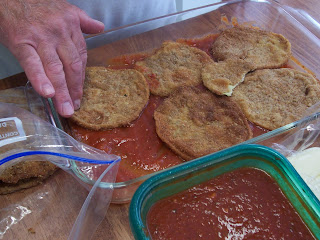
then a layer of eggplant,tear or cut pieces to fill spaces
then another layer of sauce
top with shredded mozzarella
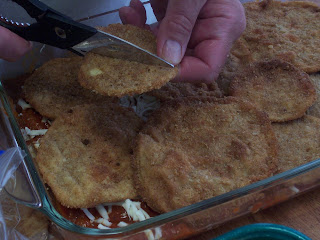
another layer of eggplant cut to fill spaces
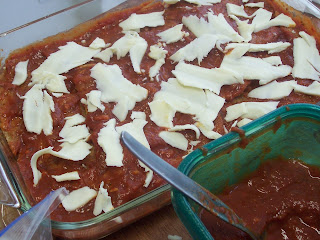
another layer of sauce and cheese ( tried a different side of the box grater)
another layer of eggplant, then sauce,then cheese, till pan is full, leftover pieces may be frozen,or used for eggplant rollatini.eggplant filled with ricotta and cheese and rolled like a crepe ,topped with sauce and baked.
cut wooden skewers in 3rds insert into pan ,this is to keep foil from sticking to the mozzarella
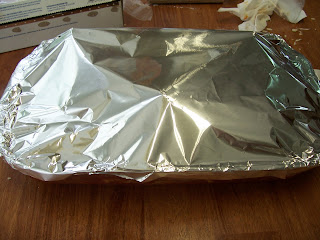
cover with foil, bake in a preheated 350 oven about 35-40 minutes, or put in fridge till needed, and then heat through, it will take longer to heat through if cold from fridge.  Hope you will give it a try!

Tiramisu

My wife and I really enjoy Tiramisu, but I will not make versions using raw egg yolks, yuck. The sabayon method is basically cooking the yolks with sugar as they are whisked over a double boiler, to a temperature of 170 degrees, cooking them, but not scrambling them. Emeril Lagasse's recipe is such, it is also a little different in structure. Most recipes call for a square or rectangular pan, I prefer to use a 9" spring form pan, as it's easier to cut a cake like slice ,than scooping out a square from a pan without making a sloppy mess of your work. Draw back ,there will be leakage from the wine in the sponge layer.I can live with that. 
I also prefer to make my own lady finger sponge using Wolfgang Puck's recipe. Lot cheaper than spending $9 on store bought!
Here is  the link to his sponge, I tried his version of Teramisu, but like Emeril's better 

 http://www.foodnetwork.com/recipes/wolfgang-puck/tiramisu-recipe/index.html

Here is the link to the recipe..........
http://www.foodnetwork.com/recipes/emeril-lagasse/tiramisu-with-chocolate-dipped-coffee-beans-recipe/index.html
Let's make some Tiramisu!!

in heat  proof bowl over simmering water beat egg yolks and sugar till light and thick,  and hot to the touch (170) do not boil! or they will scramble.
add the 1/2 cup of sweet wine ( I use Florio Sweet Marsala) and continue beating till thick
add the cooled melted dark chocolate to the egg mixture, fold in well
whip the egg whites to stiff peaks
fold into the egg chocolate mixture
to the cup of ricotta add 1/4 cup strong coffee , I use freeze dried coffee 1+1/4 tsp and water , it's quick and simple, blend well
whip heavy cream to soft peaks,add the tsp sugar and whip to stiff peaks
if using spring form pan, use bottom to 2 cut layers ,use trimmings to fill gap, or cut to required shape
I wrapped bottom in foil, place sponge layer,soak sponge with 1/2 of the 3/4 sweet wine,you can tell from the photo I forgot and had to stop and add the wine, spread half of the coffee ricotta onto sponge
spread 1/2 of the chocolate mixture onto the ricotta layer
spread 1/2 the whipped cream over the chocolate layer, the chocolate mixture should have been firmer ,as the stiff cream was difficult to spread. Realized that I mistakenly used the 3rd egg white instead of two, that caused the chocolate mixture to be too soft.
add 2nd sponge layer and soak with remaining wine
at this point I changed the order to ricotta, then the stiff cream


Note: this photo is of a second one I recently made, with all the layers in proper order  
making the chocolate mixture the final layer ,instead of  the cream, for a better appearance.cover with plastic wrap ,refrigerate at least 24 hours to set and the flavors to marry, it's even better the 3rd day!
 There you have it,Tiramisu courtesy of Emeril lagasse, and Wolfgang Puck

Lady Finger Sponge

I wanted to make tiramisu, could not find lady fingers (soft ones)  anywhere it's as if they had a season!! Looked for a recipe on line, found Wolfgang Puck's tiramisu recipe and one for the sponge included.Made his  version it was good, but I prefered Emeril's better. So now I use Wolfgang's sponge and Emeril's teramisu, I'm happy. So now that I can make my OWN lady finger sponge, I see lady fingers in every store, some one up there woke up. But still make my own, need 3 pkgs ,cost about $8, sponge cost less than $2.
 here is the lonk for Puck's recipe with lady finger sponge.........the only thing I added was a tsp of vanilla to the whipped yoks...
http://www.foodnetwork.com/recipes/wolfgang-puck/tiramisu-recipe/index.html
 Here are the steps in photos........

beat  6 eggyolk with 1/4 sugar untill light in color
in seperate bowl beat  6  egg whites to soft peaks
slowly add 1/4 sugar and beat to medium peaks
fold in half of the cup of sifted cake flour
fold in half of the egg whites
fold in remaining cake flour
fold in rest of egg whites
spread onto a 12x16 pan (this is a half sheet pan 13x17)
bake in preheated 350 oven 12-15 minutes till golden, don't look for a deep brown or it will be over baked, thats it! This can be used for all types of desserts, strawberry short cake, pudding cake layer, etc. Or how about sponge between layers of chocolate pudding and pastry cream, yummy!

Wednesday, July 20, 2011

Building Our Butterfly Garden

Butterflies received their name it's believed because the yellow ones looked like, well , flying butter! The Monarch was named by the pilgrims, the colors reminded them of the crown the King of England wore, hence the name Monarch. We all have admired and marveled at the amazing flying flowers, ( name given by native Americans), in our  gardens. The Daniel Stowe Botanical Gardens advertised a 'Butterfly Release' to take place in their Orchid Conservatory ,of course we wanted to attend such an event as never having  experienced anything like this.The DSBG, is 25 minutes from us, just above the border between North and South Carolina.
The event was very educational, as well as totally enjoyable, that experience propelled us into researching more about these marvelous insects. Through the garden staff were able to get in touch with a lady who raised butterflies in VA, and now here in NC. Renelle invited us to their home to view her Monarch caterpillars and chrysalides, we were definitely hooked! We left with a 'Hatchery Box', Tom, her husband had  built, AND several caterpillars, in addition, leaves from the milk weed plant for the 'cats' to feed on,as the plant is host specific to the Monarch.They eat nothing else, and is the plant the eggs are laid upon.
      We had the distinct pleasure of observing the cats eat, eat, eat, that's all they do non stop, till after about 2 weeks ,it's time to go into chrysalis. The cats select a high place, in this case ,the inside top of the hatchery box, they hangout so to speak till it finally attaches to the surface with silk and then hangs down in a 'J' form and begins to wrap itself in silk for the metamorphosis into a beautiful butterfly. The process takes about 12-14 days. they emerge and hang from the empty chrysalis and inflate  their wings to expand them and allow time to dry, which can take several hours.At this point they are slow,as not having fed ,usually the next day they begin to feed on nectar.After they have fed and the weather is warm (65+) they may be released into the wild to do their thing!
 The whole underlying purpose of this is to help the population ,as natural areas shrink due to development ,as predation also limits their numbers further, ants, birds and other predators take a huge toll, we can play a crucial role in helping our beautiful friends. Out of 100 eggs laid, 5 might make it to adulthood, bring them inside and protected ,well now we have close to 15 times the number reaching maturity.
 Please come along with us on our new journey into assisting the marvelous Monarch.
The first phase is of course, having a garden of flowering plants for the butterflies to feed on, and an area of host plants, in this case milkweed, of which there are two types, common, which has a wide elongated oval leaf and swamp or aquatic milk weed  which has long narrow leaves either will work


the hatchery box, or cage
Monarch cats feeding on milkweed
closeup
closeup
this cat has selected a branch in the cage to begin his/her 'J'
the cat swings to cover itself with silk
the finished chrysalis
here one has selected the inside roof of the cage
finished
12-14 days later they emerge
a plastic container with water and hole in lid to accept a small bouquet of flowers for the Monarch to feed on


Creating the garden and milkweed beds
 
dug out 2 beds about 8" deep, notice the clay layer
 
built boxes of 2x12 treated lumber to make 2 4x12foot beds
 filled with garden soil and sand
 
planting 27 milkweed we grew from seed, Renelle gave us
 
finished and mulched 2' deep
 mulching flower bed
 
growth after 3 weeks or so
 
 6-7 weeks, look like shrubs!
flower bed,assorted  plants favored by butterflies, now we just.....wait......

there are numerous web sites for info on creating a butterfly garden and raising them, a helpful book, the Family Butterfly book, i found very informative and has just about all you need to know to start.
 If you would like to email me,please do so!